Mirth HL7 to PDF example
Quick example of taking an HL7 message, in this case lab results, and creating a PDF document out of them. In fact, here is a link to the example Mirth Connect channel (XML file, right-click download) if you want to import this and go through it yourself. Below is an example HL7 message as well… but keep reading if you want a simple walk through.
MSH|^~\&|LAB|LUCENTGLOW|||200909301135||ORU^R01||D|2.3||||||||
PID|1||Z000001078||DOE^JOHN||19500213|M||CA|123 STREET^^KINGSPORT^TN^37660|||||M|||999-99-9999||||||||||||
OBR|1|1973^LAB||BMP^BASIC METABOLIC PANEL^L|||200909301134|||||||200909301134||SLOCA^STRANGE^CARL^W^^^MD||||||||LAB|F||^^^^^R|||||||||||||||||
OBX|1|ST|GLU^GLUCOSE,RANDOM^L||100|mg/dL|74-106|N||A^S|F|||200909301134|ML^MAIN LAB^L|||
OBX|2|ST|BUN^BLOOD UREA NITROGEN^L||10|mg/dL|9-20|N||A^S|F|||200909301135|ML^MAIN LAB^L|||
OBX|3|ST|CRE^CREATININE^L||3.0|mg/dL|0.8-1.5|H||A^S|F|||200909301135|ML^MAIN LAB^L|||
OBX|4|ST|BCRAT^BUN/CREATININE RATIO^L||1.9|RATIO|7.0-25.0|L||A^S|F|||200909301135|ML^MAIN LAB^L|||
OBX|5|ST|NA^SODIUM LEVEL^L||130|mEq/L|137-145|L||A^S|F|||200909301135|ML^MAIN LAB^L|||
OBX|6|ST|K^POTASSIUM LEVEL^L||3.0|mEq/L|3.5-5.1|L||A^S|F|||200909301135|ML^MAIN LAB^L|||
OBX|7|ST|CL^CHLORIDE LEVEL^L||97|mEq/L|98-107|L||A^S|F|||200909301135|ML^MAIN LAB^L|||
OBX|8|ST|CO2^CARBON DIOXIDE LEVEL^L||31|mEq/L|22-30|H||A^S|F|||200909301135|ML^MAIN LAB^L|||
OBX|9|ST|CA^CALCIUM LEVEL^L||9.7|mg/dL|8.4-10.2|N||A^S|F|||200909301135|ML^MAIN LAB^L|||
OBX|10|ST|GFR^GLOMERULAR FILTRATION RATE^L||22|ml/min|80-120|L||A^S|F|||200909301135|ML^MAIN LAB^L|||
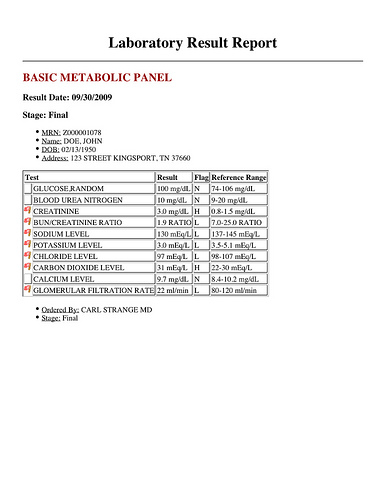
So, we have lab results coming to us in HL7 ORU messages. Maybe we are going to route these to a listener on our EMR, but lets say that for some reason we also want to create PDF files for results that may get printed, or faxed to a referring provider’s office, etc… What we want to end up with is something that looks like the following:

We can get there with 10 transformer steps, and a little HTML in a Document Writer destination.
First up, let’s think about what the end result HTML should look like. In cases where I’ve needed to create a PDF file using Mirth Connect, I’ll create an example of the HTML by hand and then think about where pieces of data from my incoming message will live there. That said, the HTML to create the report above looks like:
<html>

<body>

  <div align="center">
    <h1>Laboratory Result Report</h1>
    <hr>
  </div>

  <h2 style="color: #990000;">BASIC METABOLIC PANEL</h2>

  <h3>Result Date: 09/30/2009</h3>

  <h3>Stage: Final</h3>

  <ul>
    <li><u>MRN:</u> Z000001078</li>

    <li><u>Name:</u> DOE, JOHN</li>

    <li><u>DOB:</u> 02/13/1950</li>

    <li><u>Address:</u> 123 STREET KINGSPORT, TN 37660</li>
  </ul>

  <table border="1">
    <thead>
      <tr>
        <th colspan="2">Test</th>

        <th>Result</th>

        <th>Flag</th>

        <th>Reference Range</th>
      </tr>
    </thead>

    <tbody>
      <tr>
        <td>

        <td>GLUCOSE,RANDOM</td>

        <td>100 mg/dL</td>

        <td>N</td>

        <td>74-106 mg/dL</td>
      </tr>

      <tr>
        <td>

        <td>BLOOD UREA NITROGEN</td>

        <td>10 mg/dL</td>

        <td>N</td>

        <td>9-20 mg/dL</td>
      </tr>

      <tr>
        <td><img src="/mirth/graphics/flag_red.png"></td>

        <td>CREATININE</td>

        <td>3.0 mg/dL</td>

        <td>H</td>

        <td>0.8-1.5 mg/dL</td>
      </tr>
.
.
.


    </tbody>
  </table>

  <ul>
    <li><u>Ordered By:</u> CARL STRANGE MD</li>

    <li><u>Stage:</u> Final</li>
  </ul>
</body>
</html>
HTML similar to that above is what needs to ultimately be in the Template of your Document Writer destination in Mirth Connect.
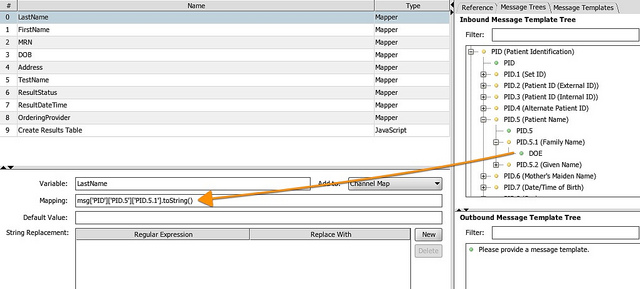
Most of the data that we need to create our HTML can be gathered directly from our incoming HL7 message and added to the Channel Map using simple Mapper transformation steps. For example, the patient’s last name:

In fact, the only somewhat complicated thing that is going on happens in the Javascript transformer step titled “Create Results Table”. In this step, we are looping over all the OBX segments contained in the incoming HL7 message to create an HTML table structured for each resultable item. Have a peek at that code here:
var results = new XML('<tbody></tbody>');
var tr;

for each (mOBX in msg..OBX) {

  tr = new XML('<tr></tr>');

  tr['td'][0] = '';
  if (mOBX['OBX.8']['OBX.8.1'].toString() != "N") {
    tr['td'][0]['img']['@src'] = '/mirth/graphics/flag_red.png';
  }
  // Test Name
  tr['td'][1] = mOBX['OBX.3']['OBX.3.2'].toString();
  // Result
  tr['td'][2] = mOBX['OBX.5']['OBX.5.1'].toString() + " "+ mOBX['OBX.6']['OBX.6.1'].toString();
  // Flag - Red if not N = normal
  tr['td'][3] = mOBX['OBX.8']['OBX.8.1'].toString();
  // Reference range
  tr['td'][4] = mOBX['OBX.7']['OBX.7.1'].toString() + " " + mOBX['OBX.6']['OBX.6.1'].toString();

  results[''] += tr;
}

channelMap.put("Results",results);
Note where I’m specifying an image to be used when a resultable item is abnormal. I created this example channel on a Mac OS X machine. However I’ve ran this same example on a Windows machine as well. On the Mac, the /mirth/graphics/flag_red.png is a literal location on the filesystem.
austin-macbook:~ austin$ ls /mirth/graphics
flag_red.png
On the Windows machine (this is speaking from my experience) this path is relative to the root of the drive that you have Mirth installed on. In my case I had Mirth installed on the C:. So the path used (/mirth/graphics/flag_red.png) would mean C:\mirth\graphics\flag_red.png on the hard drive.
All of the transformations are happening on the Source. So heading into the Destinations, we have 10 different pieces of data in our Channel Map ready to be used in the HTML template used by the Document Writer. The channel map variables are:
- LastName
- FirstName
- MRN
- DOB
- Address
- TestName
- ResultStatus
- ResultDateTime
- OrderingProvider
- Results
You can check the transformers in the downloadable example channel (here’s the link again) to see where I’m pulling this information from the HL7 message. The Results channel map variable holds the HTML table built in the “Create Results Table” Javascript step.
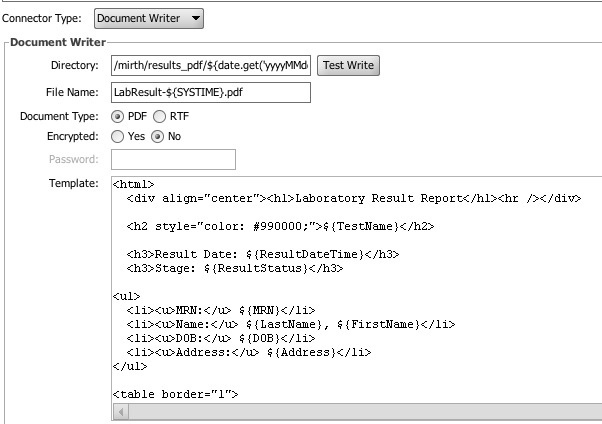
All that’s left is to fill out the Document Writer destination to have our PDF files written to disk:

Stepping through the above screen…
Directory
In my example, I’ll be writing to /mirth/results_pdf/${date.get(‘yyyyMMdd’)}/${OrderingProvider}/. That first bit is the file system location (Mac again… adjust to your needs). The second two pieces are potentially variable depending on the message.
- ${date.get(‘yyyyMMdd’)} → Will append the date (as in 20100818) to the end of the specified filesystem location.
- {OrderingProvider} → Appends the value of the Channel Map variable OrderingProvider which we set in the Source Transformer to the end of the filesystem location.
So for our example, the complete filesystem location where the PDF will be written will be something like /mirth/results_pdf/20100818/CARL STRANGE MD/. Please note that you will need to be sure that Mirth Connect has rights to create directories in the filesystem you specify.
File Name
The name of the file that will be written into the directory specified by Directory. In this example I’m using LabResult-${SYSTIME}.pdf. This will result in a filename similar to LabResult-1282176369728.pdf.
Document Type
PDF of course.
Encrypted
I have set to No, you can of course set to Yes and then specify a password on the following line.
Template
The meat of it all. First the full template I’m specifying:
<html>
  <div align="center"><h1>Laboratory Result Report</h1><hr /></div>

  <h2 style="color: #990000;">${TestName}</h2>

  <h3>Result Date: ${ResultDateTime}</h3>
  <h3>Stage: ${ResultStatus}</h3>

<ul>
  <li><u>MRN:</u> ${MRN}</li>
  <li><u>Name:</u> ${LastName}, ${FirstName}</li>
  <li><u>DOB:</u> ${DOB}</li>
  <li><u>Address:</u> ${Address}</li>
</ul>

<table border="1">
  <thead>
    <tr>
      <th colspan="2">Test</th>
      <th>Result</th>
      <th>Flag</th>
      <th>Reference Range</th>
    </tr>
  </thead>
${Results}

</table>

<ul>
  <li><u>Ordered By:</u> ${OrderingProvider}</li>
  <li><u>Stage:</u> ${ResultStatus}</li>
</ul>
</html>
In every spot in the above template you see something surrounded by ${} we are substituting one of our Channel Map variables. Also, compare the above template with the final HTML output example earlier in this post to get an idea of what the channel map replacements will look like.
Notes
- In this simple example I’m not taking into account the potential for NTE segments in the results file. Could be added without much trouble.
- There is an assumption of one result per message (no multiple ORC segments for example).
If you haven’t had a need yet to create PDF documents using Mirth Connect, hopefully this post will give you a pointer.
